How to Rank Up in Rocket League: The Complete Guide
Most advice on how to rank up in Rocket League is a list of mechanics to learn. That is the wrong order. Five things move rank, and only one of them is mechanical: rotation, positioning, the mechanics that actually matter at your level, decision making, and consistency. This page is the hub for all five.
The uncomfortable part first. The matchmaker is built to give you an even game, so if nothing about your play changes, your win rate drifts back toward half and your rank sits still no matter how many games you queue. Playing more is not a plan. Raising your ceiling is.
This guide is maintained by Climbify, where we do Rocket League rank boosting and one to one coaching with Supersonic Legend players. The habits below are the ones our coaches write up most often in replay reviews, in roughly the order they cost people games.
Why playing more games does not raise your rank
The matchmaker uses your rating to find opponents it expects you to beat about half the time. That has a consequence most players never work out: a 50% win rate is the system working correctly, not a slump.
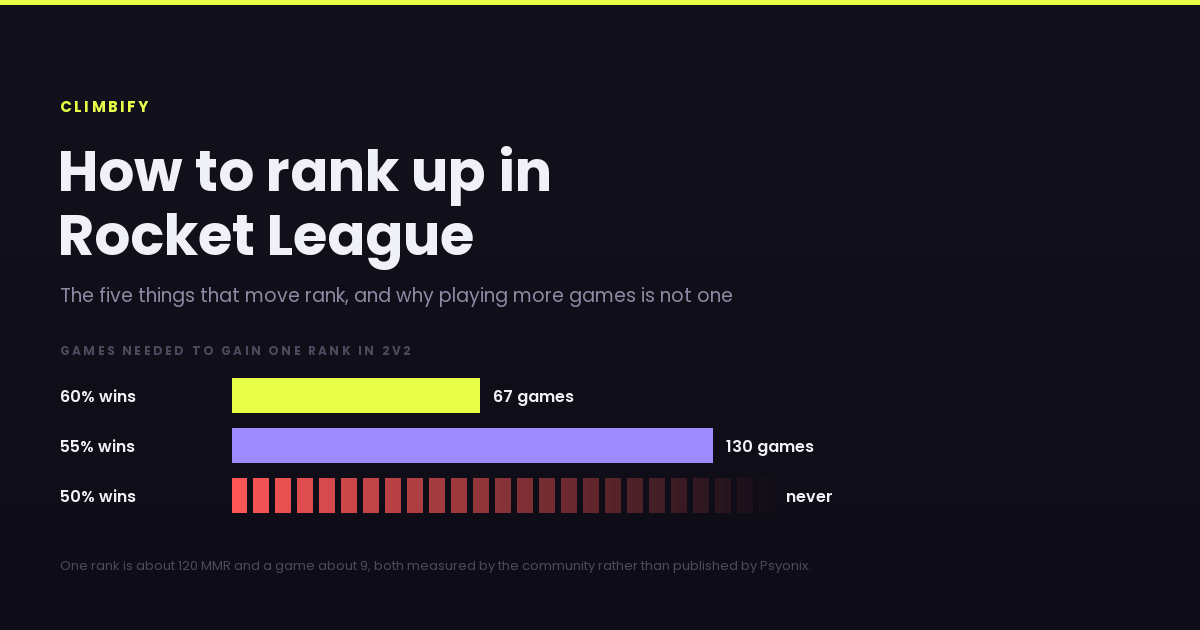
Two numbers make it concrete. Once your rating has settled in a playlist, a win or a loss is worth somewhere around 9 MMR. In Doubles 2v2 a full rank spans roughly 120 MMR, which you can check against the rank cutoffs for every playlist.
So a rank is about 13 net wins. At a 55% win rate that is around 130 games. At 60% it is about 67. At 50% it is never, however many hundreds you play. The gap between "stuck for a season" and "two ranks up by the end of it" is a handful of percentage points of win rate, which is why one fixed habit does more than a month of queueing.
1. Rotation: never be the second player going for the same ball
Rotation is not choreography and it is not a set of lanes to memorise. It is one rule with a lot of consequences: there should always be one player on the ball and one player back.
Dignitas describes the cycle as 1 to 3 to 2 to 1. Whoever just challenged becomes the last player back, the player who was last moves up to second, and second becomes the one who challenges next. The three jobs are:
- First man pressures the ball: challenges, forces a touch, or takes the 50/50.
- Second man supports, ready to take the next ball if it comes loose, and still able to recover if the challenge fails.
- Third man holds the back post, collects boost, and does not commit while a teammate is still ahead of them.
The mistake that actually concedes goals is not poor spacing, it is the double commit: two cars going for the same ball with an empty net behind them. Ball chasing is just a double commit you repeat all game.
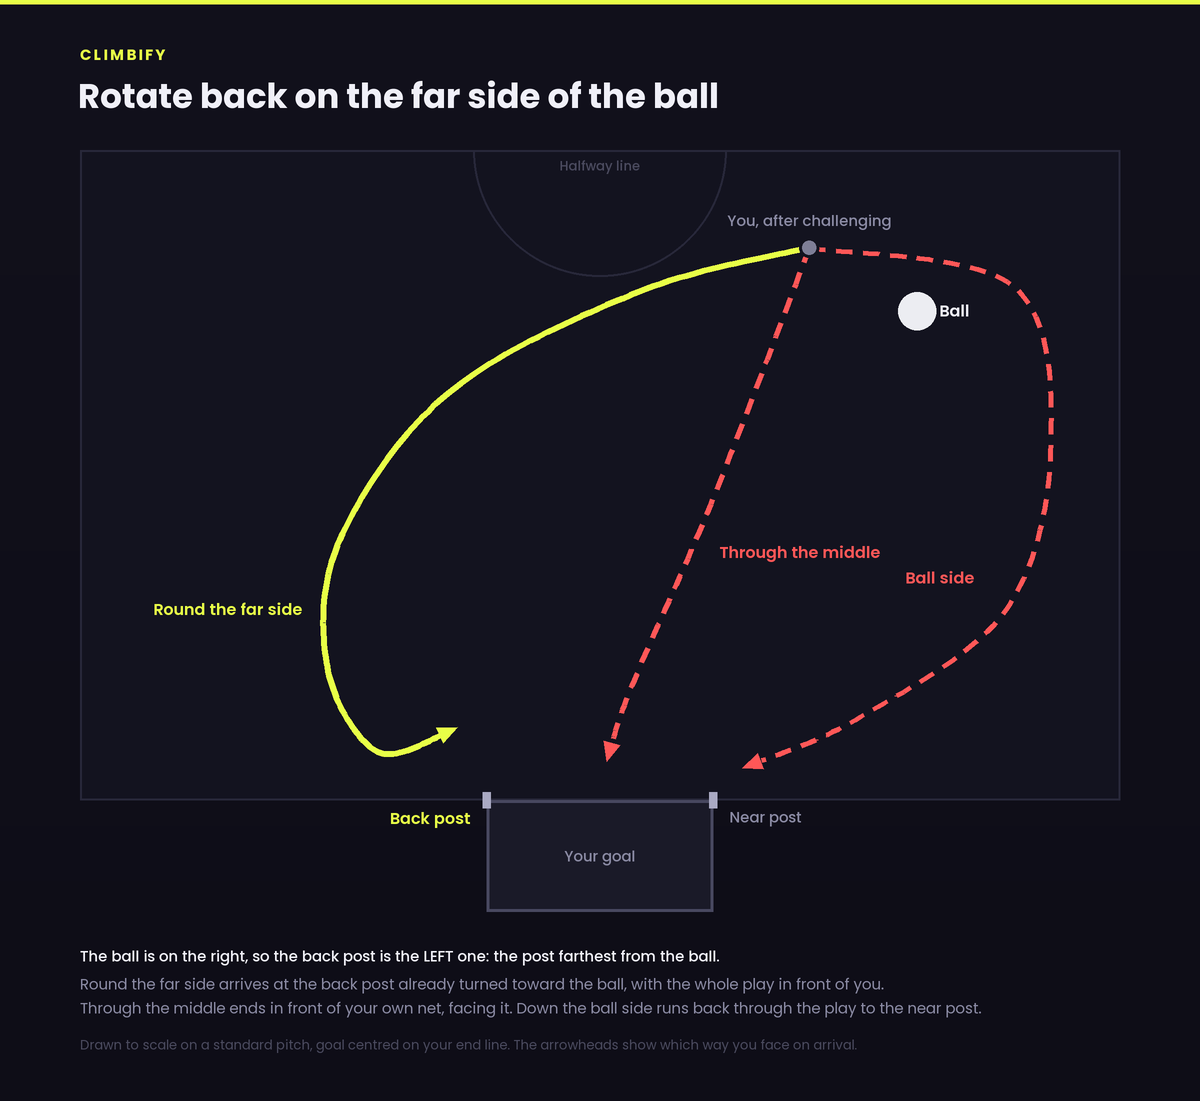
Rotate back on the far side of the ball, and arrive at the back post facing the play. Cutting straight back through the middle puts you in front of your own net facing it, which is where awkward own goals come from. Going back down the ball side drives you through the play and your teammate's path, and leaves you at the near post. Going round the far side gives you a view of the whole play and a better angle on whatever comes next.
In 2v2 one player has to carry both the second and third man jobs at once, so Doubles rotation is not Standard with a player removed. Our Rocket League coaching covers both: the back post reset that Doubles actually runs on, and third man in Standard, which is the most misunderstood role in the game.
The question to ask yourself, from the same Dignitas guide, is the fastest rotation check there is: if my opponents cleared it over my head right now, is either of us in a position to respond? If the answer is no, you are too far forward, whatever the ball is doing.
2. Positioning: the back post, and the boost you pick up on the way
Positioning is where rotation becomes specific. Two habits carry most of it.
Default to the back post, the post farthest from the ball. It sounds like a small distinction and it changes your defence completely: you get a wider angle on saves, you are moving toward the ball rather than across it, and you stop producing the own goals that come from a panicked touch in front of your own net. It is the default defensive position in organised play for a reason.
Watch the backboard. This is the one ApparentlyJack of Dignitas singles out as neglected below Champion. A ball coming off the back wall is much harder to read from the ground than one in the air in front of you, and sitting too deep means you cannot do anything about it except watch it get dunked.
Then there is boost, which is the clearest single habit separating ranks. Two habits cover most of it.
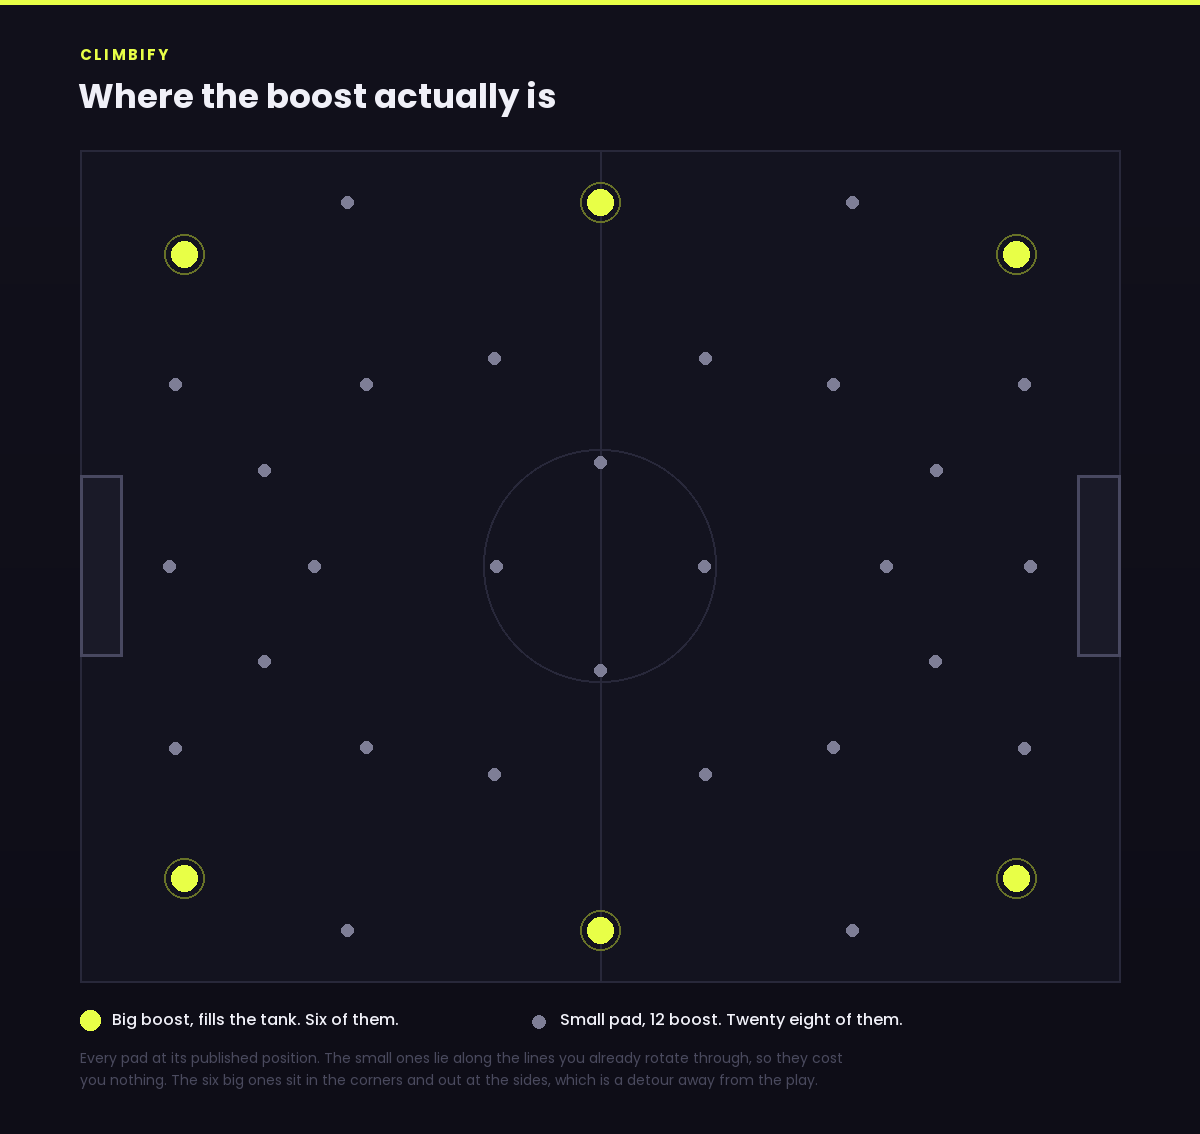
Take the small pads on your way through, instead of detouring to a corner for the big one. The small pads sit along the normal rotation routes, so collecting them costs you nothing and keeps you near the play. A detour to the corner takes you out of the game for two seconds and often leaves your teammate in a 1v2. Being last back with 20 boost and good position beats arriving with 100 and no position.
Stop holding boost once you are supersonic, the point where the trail appears behind your car. Past it the rest of the tank adds almost nothing, and holding it anyway on the ground is the most wasted resource at every rank below Champion. Tap to reach supersonic, then let go, and you will still have boost when a challenge actually needs it.
3. Mechanics: only the ones that matter at your level
This is where most people spend their practice time and get the worst return on it, because they train the mechanic they saw in a highlight rather than the one their rank is asking for.
Gold and Platinum: recoveries, not shots. Powerslide recovery so you land facing where you want to go, the half flip to turn around without a three point turn, the fast aerial so you can get up to a ball at match pace, and keeping ball cam on. None of these score goals directly. All of them decide whether you are part of the next play or watching it.
Diamond: the same mechanics, at match speed. Most Platinum and Diamond players already have the touch in free play. What they do not have is the ability to land it with a car bearing down on them and 30 boost. Deliberate repetition on a small number of patterns moves this far more than another night of ranked.
Champion and above: speed of decision, plus kickoffs. The speedflip is genuinely worth the practice here, as is real air roll car control. What separates Champion from Grand Champion is not a new trick, it is reading the play early enough that your first touch is already the right one.
The honest version of this section: flip resets and air dribbles are not what is holding a Platinum player back. They are fun, they are worth learning eventually, and they will not fix a double commit.
4. Decision making: when to challenge and when to hold
Rotation tells you where to be. Decision making is the half second where you choose to go or not, and it is the single thing our coaches correct most.
- If you are last back, shadow first and challenge second. Shadow defence means turning and matching the attacker's speed between them and your net, rather than meeting them head on. It keeps every option open and forces them to commit first.
- Your go moment is when the ball gets too far from their car. That is the gap. Challenging before it appears is how you get flicked over.
- Never challenge while you are moving backwards. If you are backpedalling into a 50/50, stay in net and save the shot instead. A save is a much better bet than a 50/50 you contest with no momentum.
- On defence, a won 50/50 is one where the ball ends up somewhere safe, not one where you come out with possession. Judge it by where the ball goes, not by who hit it hardest.
- Clear with intent. ApparentlyJack's version: put the ball where your teammate can beat your opponent to it. Scan before you hit, not after.
The common overcorrection is to hear "stop ball chasing" and go passive, sitting back and doing nothing while the other team sets up shot after shot. The fix is not a rule that says never challenge, it is a read for which challenges are worth taking, and that genuinely is easier to learn from someone watching your replays than from a video about someone else's.
5. Consistency: the part that quietly decides your season
Everything above is about raising your ceiling. This is about how often you play at it.
Warm up before you queue, not during. DIG Dreaz warms up for around 15 minutes before scrims, and fifteen minutes is about the length of two ranked games, which is the whole argument: you are going to shake off the rust somewhere, and doing it in free play costs you nothing while doing it in ranked costs you MMR.
Free play is the bulk of it. Dreaz calls it a really big part of improvement, and uses slow motion at the end because it makes the real game feel faster afterwards. If you use training packs, pick two or three and stay on them. Around fifteen minutes per pack is where the returns flatten, and spreading across eight packs gives your hands nothing to learn.
Stop on a losing streak. Nobody has measured this properly and we are not going to pretend otherwise, but every coach gives the same advice and the mechanism is obvious: tilt makes you challenge everything, challenging everything loses games, and losing games makes you more tilted. Set a number of consecutive losses at which you quit for the night, and hold to it.
Queue one playlist. MMR is per playlist, so splitting an evening across 2v2, 3v3 and a few Rumble games spreads your games over three separate ratings and moves none of them. Pick the one you care about.
How long does it take to rank up in Rocket League?
There is no number of games that does it, because there is no quota. Your rank is a label on your MMR, and it updates when the number crosses a line.
What you can estimate is the distance. One rank in 2v2 is roughly 120 MMR, a game is worth around 9, so you need about 13 more wins than losses. How long that takes is entirely down to win rate: around 130 games at 55%, around 67 at 60%, and forever at 50%. That is the whole reason this guide is about habits rather than hours.
Can you rank up without coaching?
Yes, and plenty of people do. What coaching buys is time. The five sections above are the map, but knowing that double commits lose games is different from knowing that you double commit in the fourteenth second after a kickoff when your teammate takes a bad touch, which is the kind of thing a review names in twenty minutes and fifty solo games will not.
A replay review is the cheapest way in: you send a game, you get written notes naming the recurring mistake and the timestamps where it cost you. If you are at a specific wall, Champion coaching and Grand Champion coaching are built around the habits that break at those exact ranks.
And if you would rather have the rank than the lesson, our boosting calculator prices any climb in about a minute, played by verified Supersonic Legend players with VPN protection and live tracking. The two are not in competition: the boost gets you out of the lobby you are sick of, the coaching is what keeps you there.
Where this advice comes from
The pitch, goal and boost pad positions in both diagrams come from the RLBot useful game values reference, which reads them out of the game itself, as do the pad amounts on the boost map.
The rotation and defence sections draw on Dignitas coaching articles, specifically their guide to movement and positioning, their boost management guide, and a guide to defence with ApparentlyJack. The warmup section comes from their interview with DIG Dreaz.
The MMR figures are observed rather than official. Psyonix has never published the rating system's constants, so the roughly 9 MMR per game and the rank widths are what the community has measured, and the per playlist cutoffs are on our MMR rank cutoff page with the same caveat. Treat them as close, not exact. The arithmetic above does not change if a game is worth 8 or 10.